How to Do Proper Facial Gua Sha at Home
What Is Gua Sha?
Gua sha is one of several non-needle techniques we use as treatment in Chinese Medicine. It is an ancient technique and its simplicity allowed it to be used in the clinic as well as in homes in Asian communities. “Gua sha” literally translates as “scraping sand” but this is a bit misleading. “Gua” means the technique of scraping the skin and “sha” actually refers to transitory therapeutic petechiae…tiny little red or purple spots of blood that result from broken capillaries. Thus, gua sha is a scraping technique that uses an instrument to bring up the “sha” for therapeutic benefit.

How is Gua Sha Generally Done?
Any smooth, flat-edged tool can be used to perform gua sha. A cheap and readily-available tool that works great for this technique is a Chinese soup spoon. Jar lids or coins are other handy implements that can be used in a pinch. A lubricant (usually a carrier oil or balm or even Vick’s Vaporub if doing gua sha on the body) is first applied to the skin and then the “scraping” is done in even strokes along one direction. The depth of pressure applied and the length and direction of the stroke is dependent on the region of the body that is being treated and the depth of the tissue being targeted. The scraping is repeated over the region until the sha (the petechiae) come up (this will look very much like the rash from “carpet burn”).
Why Do Gua Sha?
In Chinese Medicine we say that gua sha increases the Qi flow to the tissues. When the Qi (vital energy) is flowing uninhibited, the blood circulation and lymphatic flow will be optimal. This allows for efficient cell regeneration and tissue repair. Studies have shown that gua sha can increase blood flow, improve lymphatic drainage, increase immune function and reduce allergic responses. This results in increased tissue healing, increased cell protection from oxidative damage, reduced inflammation, reduced fever, and reduced pain. These effects have been measured immediately after treatment and for several days following gua sha treatment.
How Does Facial Gua Sha Differ?
When the technique of gua sha is used on the face, we apply much lighter pressure and we do not intentionally raise the sha (get petechiae to appear). The skin of the face is very delicate and has more capillaries than elsewhere on the body, so there is a greater risk of bruising and we do not want to induce bruising on the face (especially in cases of rosacea where that damage can be permanent).
When performed correctly, facial gua sha can have wonderful, lasting benefits for the face and complexion:
Reduce the appearance of fine lines and wrinkles
Lift sagging skin such as eye lids, jowls, chin and neck
Disperse dark spots and brighten the complexion
Reduce redness, inflammation and blemishes
Reduce puffy eyes
Tighten pores
The Gua Sha Tool
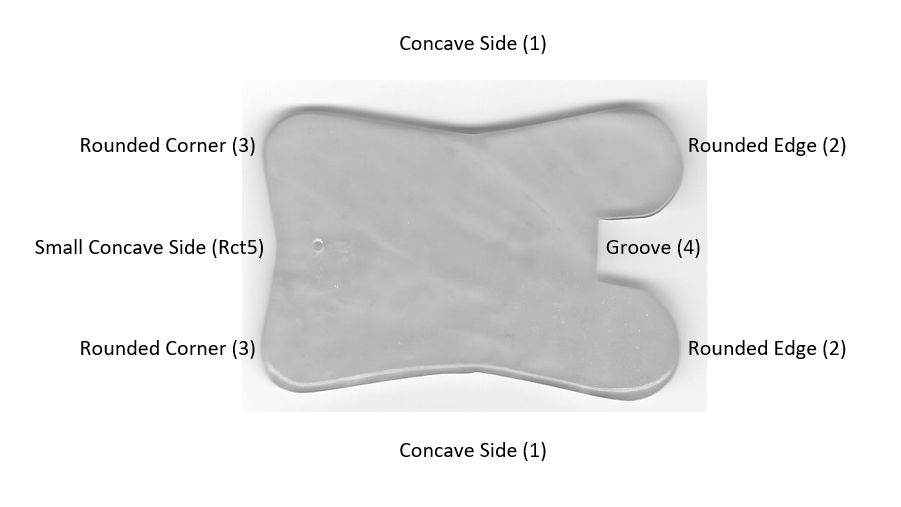
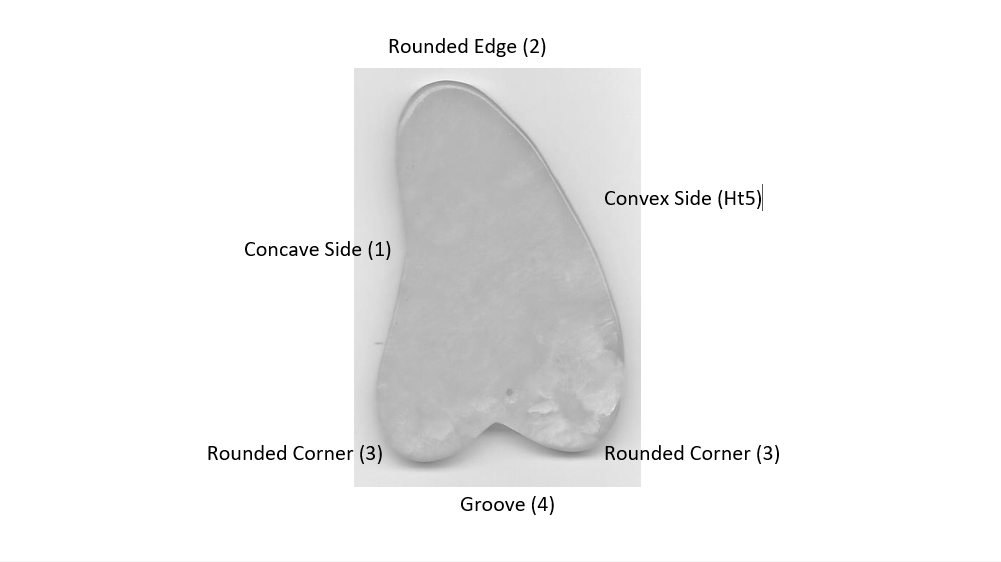
There are many shapes for gua sha tools and they can be made from various materials. Agate, jade, jadeite, rose quartz, or other natural stone are the best materials for use on the face. Here are 2 very common shapes. The corners and edges are named and numbered to help you decide which way to angle your tool when you follow the strokes in the protocol we share below.
Prep Your Face & Neck
Gently cleansing to remove dirt and makeup. Pat dry.
Blend in several drops of one of CMD Skin Solution’s herbal facial serums to each area of your face where you will perform gua sha.
Choose from one of the following herbal facial serums:
Solution AC Facial Serum for acne or blemish-prone complexions
Solution RO Facial Serum for rosacea or red/sensitive complexions
Solution MN Facial Serum for normal, dry or mature complexions
Apply to the following areas:
Forehead
Under and around eyes
Cheeks
Upper lip
Chin and jaw line
Neck/upper chest (décolletage) - you may need to apply more drops by the time you get to this part of the protocol if your skin absorbs the Serum too quickly)
Facial Gua Sha 15-Minute Home Protocol
For all gua sha steps outlined in this protocol, we will reference the tools shown above, but you can choose the tool and edge shape that is best suited to the unique contours of your face. Unless otherwise directed, hold the tool at a 15 degree angle to the skin (not quite flat on the skin, but not digging in with the edge of tool either). Most of the time, your palm will be facing you when you are holding the tool. Apply enough gentle pressure to feel the benefits of the scraping motion (a gentle tug on your skin), but not so much that the skin feels tender or abraded. We do not want to cause bruising, just mild pinkness associated with increased circulation. Perform the protocol on BOTH sides of your face to maintain symmetry. The general rule of thumb for the direction of the strokes is UP & OUT. Upward stroke are energetically lifting; outward (lateral) strokes help promote drainage of accumulated fluids and toxins.
Forehead: Use Concave Side (1) or (Rct5)
Holding the tool in your right hand, begin at the bridge of your nose and slowly scrape upwards to the hairline (along the centerline of your forehead). Repeat 5 times.
Gently press the fingers of your left hand above your left eyebrow to anchor the loose skin of forehead (this prevents too much loose skin getting tugged). With the tool in your right hand, place the edge of the tool at the center of your forehead and gently sweep laterally to the side hairline. Repeat 5 times.

Eye:
Place the fingertips of your left hand between your eyebrows to anchor the skin. Using Concave Side (Rct5) or Convex Side (Ht5), begin between your eyebrows and gently sweep over the right brow all the way lateral to the temple. Repeat 5 times.
Repeat step 1 but this time, when you get to the lateral 1/3 of your eyebrow, turn the gua sha tool 90˚ and sweep upward over the forehead toward the front hairline (lifting the edge of the eyebrow upwards).
Close your eyes. Place your left fingers at the inner corner of your right eye to stabilize the skin. Using Rounded Corner (3), hook this corner of the tool under the eyebrow bone and gently sweep outward to the lateral edge of the eye socket. Do not put any pressure on the eyelid or eyeball. Repeat 5 times.
Eyes are still closed. Place left fingers at right side of your nose to stabilize the skin. Using Concave Side (Rct5) or Convex Side (Ht5), begin at the right side of your nose and gently sweep laterally over the cheek bone (just under the right eye) all the way out to the temple. Repeat 5 times.
Eyes are still closed. Place your left fingers at the inner corner of your right eye to stabilize the skin. Using Rounded Corner (3), hook this corner of the tool on the lower ridge of your eye socket. Gently sweep outward along the bone to the lateral edge of the eye socket. Do not put any pressure on the eyelid or eyeball. Repeat 5 times.
Repeat steps 1 through 5 for the left side of your face.
Cheek: Choose Concave Side (1) or Small Concave Side (rct5) or Convex Side (ht5)
Hold your left fingers on the centerline of your nose to anchor the skin. Holding the tool with your right hand, begin at the right side of your nose and sweep laterally toward the ear. Keep the top edge of the tool hugging the underside of the cheekbone. Repeat 5 times.
Repeat the above step for the left cheek.
Upper Lip Area: Use Rounded Edge (2)
Place your left fingers between your upper lip and nose, just to the left of center, to anchor the skin. Hold the tool slightly more perpendicular to the skin. Begin at the center above your upper lip and use a quick up-and-down motion as you slide the tool outward past the smile lines (envision drawing a zig-zag line as you pull the tool laterally). Repeat 5 times.
Keep your left fingers between your upper lip and nose, just to the left of center, to stabilize the skin. You will sweep over the section between the upper lip and nose again, but this time hold the tool at the typical (flatter) angle of 15˚ as you glide it smoothly from the center outward, past the smile lines all the way to the ear. Repeat 5 times.
Repeat steps 1 & 2 on the left side.
Chin/Jawline: Use Groove (4)
Place fingers of left hand just to the left of the center of the chin to anchor the skin. Place the Groove (4) of the tool on your jaw bone (one rounded edge of the tool will sit on the top edge of your jaw, and the other rounded edge of the tool will sit on the underside of the bone). With a slow and steady stroke, sweep outward and upward along your jawline, following the bone all the way to the ear. Repeat 5 times.
Repeat on the left side of the face.

Neck:
Apply a few more drops of Facial Serum if skin has absorbed the initial application)
For the front of the neck, choose Small Concave Side (Rct5) or Valley (4) or Concave Side (1), depending on comfort level. Place left fingers at sternal notch to stabilize skin. (You want this process to focus on the skin of the neck. You do not want the skin of your upper chest getting pulled upward). Press tool at the base of the anterior neck and sweep upwards to the chin. Lighten pressure or lift tool off skin as you pass over Adam’s Apple. Repeat 5 times.
For lateral strokes on neck, choose Concave Side (1) or Convex Side (Ht5). Spread fingers of left hand vertically along the front of your neck to stabilize skin. Place tool at centerline of neck and sweep to the right, all the way over to the side of the neck. Repeat 5 times.
Switch hands and repeat step 2 for the left side of your neck.
Finsihing Touches
Allow any serum remianing on the surface of your skin to fully absorb. Apply 1 to 2 pumps of the matching CMD Skin Solutions Herbal Facial Crème to your face, and a few pumps of crème to the neck and upper chest.
Perform the Facial Gua Sha Home Protocol 2 to 3 times per week for best results. The protocol can be done in the morning or at night before bed – it is your preference. You can do the Eye portion of the protocol daily for puffy eyes, dark circles or bags under the eyes but be VERY GENTLE when doing the protocol this often. The delicate skin around the eyes can bruise easily.
If you haven’t got enough time to perform this complete routine, you can shorten it by repeating each stroke only 3 times each (instead of the recommended 5 times) or you can skip the areas of the face that are less important to you.
